Introduction
Have you recently updated your PHP version and encountered compatibility issues with your existing code? Don’t worry, you’re not alone. Many developers face this challenge when upgrading to the latest PHP version. In this blog post, we’ll guide you on how to downgrade PHP 8 to 7.4 in Ubuntu with a live example.
Why Downgrade PHP?
Before we dive into the process, let’s quickly discuss why you might need to downgrade PHP. While the latest PHP version brings improvements and new features, it can also introduce compatibility issues with older codebases. Some frameworks, libraries, or plugins may not be fully compatible with PHP 8 yet. Downgrading to a stable and widely supported version like PHP 7.4 can help ensure the smooth functioning of your applications.
Step-by-Step Guide to Downgrade PHP 8 to 7.4
Step 1: Check Current PHP Version
The first step is to check the current PHP version installed on your Ubuntu system. Open the terminal and enter the following command:
php -v
This command will display the current PHP version installed.
Step 2: Remove PHP 8
To downgrade PHP, we need to remove the PHP 8 packages from our system. Run the following command in the terminal:
sudo apt-get purge php8.*
This command will remove all PHP 8 packages from your Ubuntu system.
Step 3: Add PHP 7.4 Repository
Next, we need to add the PHP 7.4 repository to our system. Run the following commands in the terminal:
sudo add-apt-repository ppa:ondrej/php
sudo apt-get update
These commands will add the PHP 7.4 repository and update the package list on your Ubuntu system.
Step 4: Install PHP 7.4
Now, it’s time to install PHP 7.4 on your Ubuntu system. Run the following command in the terminal:
sudo apt-get install php7.4
This command will install PHP 7.4 and its dependencies on your system.
Step 5: Install PHP 7.4 as Default
Ubuntu allows us to install and use multiple PHP versions on a single system. You can easily set any version as the default without uninstalling others.
sudo alternatives --config phpThis will show you a list of installed PHP versions as below.
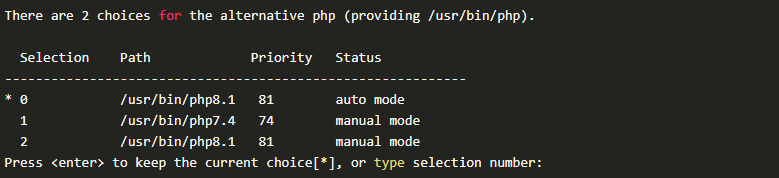
Enter the selection number to make any PHP version as default. For example, to set PHP 7.4 as default, input “1” and hit enter.
Step 6: Verify PHP Version
To ensure that the downgrade was successful, verify the PHP version once again using the following command:
php -v

Step 7: Configure PHP 7
Then, need to configure PHP 7 to work with your system and applications. You can do this by editing the php.ini file using the following command.
sudo nano /etc/php/7.4/cli/php.iniYou can make any necessary changes to the file and then save it.
Congratulations! You have successfully downgraded PHP 8 to 7.4 on your Ubuntu system.