Creating a Form Request
To get started, let’s imagine we have a form for creating blog posts. We want to validate the title and content fields. To create a Form Request class, open your terminal and run the following Artisan command:
php artisan make:request CreatePostFormThis command generates a file named CreatePostForm.php in the app/Http/Requests directory.
Defining Validation Rules
Open the newly created CreatePostForm.php file. This class contains two methods: authorize() and rules().
The authorize() method typically checks if the current user has the authority to submit the form. Since we want any authenticated user to submit a post, we can simply return true:
public function authorize()
{
    return true;
}
The rules() method defines the validation rules as an associative array. The array keys correspond to form field names, and the values define the validation rules. For example, to make the ‘title’ and ‘content’ fields required, define the rules like this:
public function rules()
{
    return [
        'title' => 'required',
        'content' => 'required'
    ];
}
Your CreatePostForm.php should now look something like this:
namespace App\Http\Requests;

use Illuminate\Foundation\Http\FormRequest;

class CreatePostForm extends FormRequest
{
    public function authorize()
    {
        return true;
    }

    public function rules()
    {
        return [
            'title' => 'required',
            'content' => 'required'
        ];
    }
}
Using the Form Request
With your Form Request class in place, you can integrate it into your controller. In your controller method where you handle the form submission (e.g., PostController@store), replace the Request class with your CreatePostForm class and add a use statement to import the Form Request class:
use App\Http\Requests\CreatePostForm;

public function store(CreatePostForm $request)
{
    // Your logic for storing the validated data
}
By hinting the CreatePostForm class, Laravel will automatically validate the incoming form data based on the rules defined in the Form Request class before your controller method is executed.
Displaying Validation Errors
Now that you’ve set up form validation, let’s ensure that validation errors are properly displayed to users. In your view file, Laravel provides an $errors variable that contains all the validation errors. You can check if a field has an error and display the error message accordingly.
For example, to check if the ‘title‘ field has errors and display the first error message, you can use:
<div class="form-group @if($errors->has('title')) has-error @endif">
    <!-- Your form input for 'title' -->
    <span class="text-danger">{{ $errors->first('title') }}</span>
</div>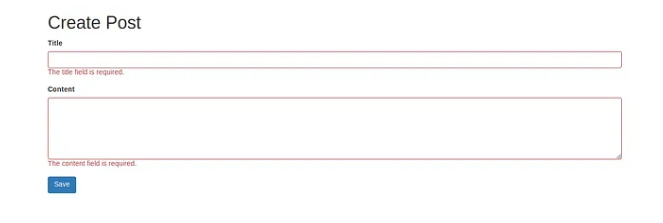
This code adds a has-error class to the form group if there are errors for the ‘title’ field and displays the first error message in red.
With these steps, you’ve simplified form validation in Laravel using Form Requests. It’s a clean and organized way to define validation rules and ensure your application’s data is accurate and secure.