Introduction
Have you ever wondered how to create an autocomplete feature with images and custom HTML code using Jquery UI? Well, you’re in luck! In this blog article, we will explore the process of implementing autocomplete with images and custom HTML code in Jquery UI. Get ready to take your autocomplete game to the next level!
HTML:
<!DOCTYPE html>
<html lang="en">
<head>
  <meta charset="UTF-8">
  <meta name="viewport" content="width=device-width, initial-scale=1.0">
  <title>Autocomplete with Images</title>
  <link rel="stylesheet" href="//code.jquery.com/ui/1.12.1/themes/base/jquery-ui.css">
  <script src="https://code.jquery.com/jquery-3.6.4.min.js"></script>
  <script src="https://code.jquery.com/ui/1.12.1/jquery-ui.js"></script>
  <style>
    .custom-autocomplete-item {
      display: flex;
      align-items: center;
      padding: 5px;
    }

    .custom-autocomplete-item img {
      border-radius: 50%;
      margin-right: 10px;
    }
  </style>
</head>
<body>

  <label for="autocomplete">Search:</label>
  <input type="text" id="autocomplete">

  <script>
    $(document).ready(function() {
  // Sample data for autocomplete
  const data = [
    { label: 'Roshan', value: 'Roshan jha', image: 'https://placekitten.com/50/50' },
    { label: 'Amit', value: 'Amit Thakur', image: 'https://placekitten.com/51/51' },
    { label: 'Avi', value: 'Abhishek', image: 'https://placekitten.com/52/52' },
    // Add more data as needed
  ];

  // Autocomplete initialization
  $('#autocomplete').autocomplete({
    source: data,
    minLength: 0,
    select: function(event, ui) {
      // Handle the selected item (ui.item) here
      console.log(ui.item);
    },
    focus: function(event, ui) {
      // Prevent input value from being updated when focusing on an item
      event.preventDefault();
    }
  }).autocomplete('instance')._renderItem = function(ul, item) {
    // Custom rendering for each item in the dropdown
    return $('<li>')
      .append(`<div class="custom-autocomplete-item"><img src="${item.image}" alt="${item.label}" width="50" height="50">${item.label}</div>`)
      .appendTo(ul);
  };
});

  </script>
</body>
</html>
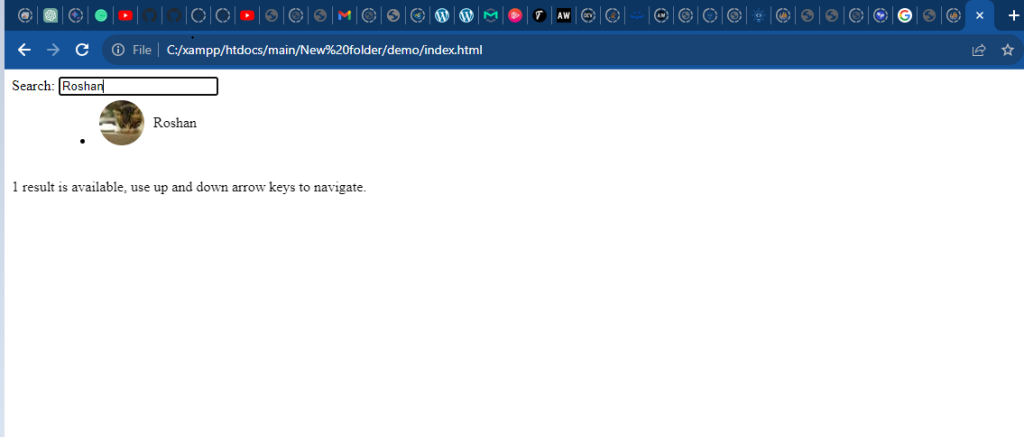
View:-

Output:-
Image :-1

Image:-2

Image :-3
Hopefully, It will help you…!!!